Why Javascript?
After you learned HTML and CSS, you can build beautiful websites. But there's one problem: they're static. There's no interaction with the users.
In a website built only with HTML and CSS, users can just scroll up and down and click on links. With JavaScript, we'll add a layer of interactivity that will make our websites much richer in terms of usability.
Users will be able to open and close menus, expand and collapse sections, navigate through photo sliders, use filters on product pages and much more. With JavaScript, our website will be dynamic!
Where to write JavaScript code
JavaScript's code can be written inside script tags. Those look just like normal HTML elements, and they can be placed in the head or in the body section. For most cases, the best place to include the script tags will be at the end of the body element.
<!DOCTYPE HTML>
<HTML>
    <head>
        <script>
    // Javascript code can be written here
    </script>
   </head>
   <body>
       <!-- page content  -->
        <script>
      // Javascript code can be written here
      </script>
    </body>
</HTML>
However, the best place to write JavaScript code is in separate .js files. In this case, the script tag will serve as a link to that file.
<body>
    <!-- html here-->
    <script src='js/scripts.js'></script>
</body>
Writing the first JavaScript statements
Using the scripts.js file we've just created, let's write a few statements.
    alert('Sending a message via alert');
    console.log('Sending a message via the console');
Now refresh the page and see what happens. The message passed through the alert function shows on a pop-up, and the message sent through the console.log() function can be seen on the browser's inspector. Open inspector by combination Ctrl + Shift + I and choose the Console tab.
The things we send to the console are not for the users, this is actually an extremely useful tool to identify mistakes in your code and understand what our JavaScript code is doing.
Syntax
Statements
Statements are instructions to be executed by the web browser. Every statement may finish with a semicolon ;, but it's not necessary. The JS code composes of multiple statements will be executed in sequential order, from top to bottom.
console.log('statement 1');
console.log('statement 2')
Each web browser has its own JS interpreter that is responsible for executing the statements you write. They are also called JavaScript engines.
Comments
Like every other programming language, we can use comments in JS to indicate lines of code that should be ignored by the interpreter. The double forward slashes // are used for one-line comments and multi-line comments can be done just like in CSS, starting with /* and ending with */.
// This line of code is commented and will be ignored by the web browser
    console.log('This statement will be executed');
// console.log('This statement has been commented and will be ignored');
/*
None of these lines
will be executed
by the interpreter
console.log('This statement will be ignored');
*/
The most popular text editors have shortcuts to toggle comments. In Visual Studio Code, you can use SHIFT + ALT + A to comment or uncomment lines of code. You can also find those options in the menu Edit > Toggle Line Comment and Toggle Block Comment.
Case Sensitive
JS is a case-sensitive language, which means that:
// This:
console.log('something');
// Is not the same as this:
Console.log('something');
The last example will result in an error because there's no object called “Console” with a capital “C”. Because of this, we should be very careful with the names of objects, properties, and methods, so we don't make mistakes that will generate errors in our code.
DOM - Document Object Model
Now that we've had a short introduction about how JS works, you need to learn how to interact with elements of a page.
What is the DOM?
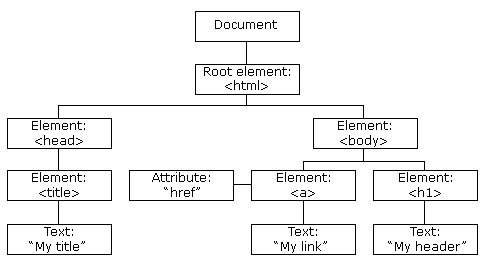
The Document Object Model is an object created by the web browser as soon as the page loads. This object contains all the nodes of our HTML page, which are the HTML elements. A simple example provides below:
<HTML>
     <head>
         <title>My Title</title>
     </head>
    <body>
      <h1>My Header</h1>
          <a href="#" >My Link</a>
  </body>
</HTML>
When the page loads, the browser generates the DOM tree, as shown below:

On the image, we can see that the parent element of all other elements in the DOM is the Document object. So we will always use this object to select elements on our page.
With the DOM, we'll be able to:
- Add, change and remove HTML elements
- Change attributes of HTML elements (like the 'class' or the 'src' of an image.)
- Change the CSS
- React upon page events (click, scroll, form input, hover, etc)
Working With the DOM
To interact with the HTML elements of our page, we'll need to use some methods and properties of the document object.
getElementById and innerHTML
To select HTML elements, we can search for them by their class name, Id, tag name (h1, p, img, div, etc.) and more. Let's start with the ID.
This element has id="blue_box". Can you get the text inside it and send it to the console? And can you change its content?
To select this element, we need to use the getElementByID method and the innerHTML property. Remember that JS is a “case-sensitive” language, so be careful with the letters that must be written in caps.
// Getting the content of an element
document.getElementById("blue_box").innerHTML;

// Changing the content of an element
document.getElementById("blue_box").innerHTML = "new content";
Now based on what we've seen above, let's try to send the content of the blue box to the console then change its content.
console.log( document.getElementById("blue_box").innerHTML);
document.getElementById("blue_box").innerHTML = "new content";
This seems like a silly example, but this is just the starting point to understand how to work with elements and their content.
We'll soon start doing more complex examples like getting user input, changing CSS of elements, and what's more important: performing those actions after an event fired by the user, like the click of a button.
Before we can start doing that, though, there is some basic knowledge about JavaScript and programming in general that we need to acquire first.
Variables
Computer programs exist to manipulate data. What they basically do is receive some input, process it and show some output. So far, we haven't seen our websites as computer programs yet because we only had static pages. But from this moment on, if we want our websites to be dynamic and interactive, we need to think of them as computer programs running on the web.
JS have 2 types of variables: let and const.
The let statement declares a block-scoped local variable, optionally initializing it to a value.
const is block-scoped like the previous one. The value of a constant can't be changed through reassignment, and it can't be redeclared.
Take a look at the simple example of interactivity with the user below.
In this example, we are working with data. We get the user input, generate the greeting message and show it inside an HTML element. There's also some logic involved because if the field is blank, we replace the user input with “guest user”.
To work with data in a computer program, we need variables.
Variables user to store data, so we can use them later. Therefore, we need to give them names, so we can refer to them. The name of a variable also calls the identifier.
We create variables using the let keyword followed by its name, then an equal sign and the value we want to assign to it.
let user_name = "guest user";After assigning the string value “guest user” to the variable, we can access it anytime we want. To test it, let's create a variable like the above and then run the following statement:
console.log(user_name);What's the use of sending this value to the console? This is a good method of testing. Now that you know that our variable create and the value has been correctly assigned to it, we can use it to form the greeting message and place it inside that HTML element.
document.getElementById("user_greeting_message").innerHTML = "Hello " + user_name + "!";Before we move ahead, you need to know some rules for naming variables.
Variable names or Identifiers
Variable names can contain:
- Letters
- Numbers
- Underscores (_)
- Dollar signs ($)
Important: Variable names can contain numbers but they can't start with numbers. White spaces are also not allowed.
See below a few examples of names:
    a             // ok
    name          // ok
    $name         // ok
    students_name // ok
    student_1     // ok
    1_b           // invalid because it starts with a number
    my-name       // invalid because it has a dash (only underscores are allowed)
    my name       // invalid because it contains a white space
    new           // invalid because 'new' is a Javascript reserved word, like will be explained below.
If you speak a foreign language, avoid using characters that don't exist in the English alphabet, like ї, ą, å, é, 国, etc.
Although they are acceptable, we should also write a universal code that can be easily maintained by anyone who understands English.
Keywords
Keywords (or reserved words) are used for internal functions and commands and therefore can't be used as variable names. See below some examples of keywords:
- function
- if
- else
- var
- new
- return
- break
- default
- in
See the complete list of keywords here.
Case Sensitive
As explained earlier, JavaScript is a “case-sensitive” language, so have this in mind when creating your variable names. If you name a variable as username and then try to call it a Username you will get an error.
Keep your names meaningful and self-explanatory
Good code should be easily understood, not only by who wrote it but also by other people, so think of that when naming your variables.
If we're to create a function to get the first and last name of a person, which of the names below do you think we should choose:
//Option # 1:
let first_name = "John";
let last_name = "Doe";

//Option # 2:
let name1 = "John";
let name2 = "Doe";

//Option # 3:
let a = "John";
let b = "Doe";
It should be pretty obvious that the first option is the best one. The second option is acceptable, but not good enough. The third option is terrible.
Naming convention
Programming languages normally have naming conventions to make the code more easily readable. JavaScript's programmers usually choose the lower camelCase style for naming variables. This means the first letter is lowercase and the first letters of subsequent words are in uppercase.
// camelCase examples:
let firstName
let lastName
let exchangeRate
let maxContainerWidth
let screenSize
Using only lower case characters and underscores to separate words, like last_name or max_container_width, is also common. Pick the style you feel most comfortable with and keep consistent. Also, try to keep the names as short as possible, which
means that firstName is better than firstNameOfTheUser.
